2. Insert a new layer and rename it "Buttons".
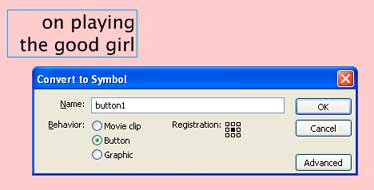
3. Select the Text tool again and click on the stage to begin typing the title of your first button. When you're finished, select the Selection tool (the black arrow tool) to exit the Text tool. Choose Modify>Convert to Symbol. Enter a name for your Button symbol, select Button, and click OK.
4. Now you will need to edit your new Button symbol in order to define how your button looks when a mouse cursor interacts with it.
Enter symbol-editing mode by doing any one of the following:
-Double-click on the item or preview window in the Library
-Choose Edit>Edit symbols
-On the top right-hand corner of your Flash document, click on the Edit Symbols buttons.
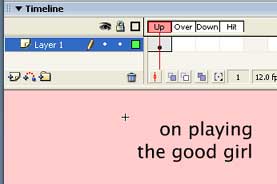
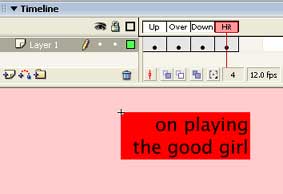
5. You will see four distinct states on the timeline of your Button symbol: UP, OVER, DOWN, and HIT.
The UP state shows what the button looks like when the mouse cursor is not interacting with it.
6. Choose Insert>Timeline>Keyframe. A new keyframe is created in the next frame, which is the OVER state, and the contents of the previous keyframe is copied into it.
Select the text in the OVER state and change its color in the Property Inspector.
The OVER state shows what the button looks like when the mouse cursor hovers over it.

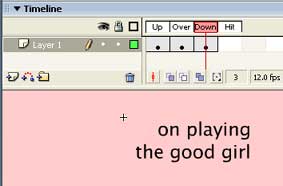
7. Choose Insert>Timeline>Keyframe. A new keyframe is created in the next frame, which is the DOWN state, and the contents of the previous keyframe is copied into it.
Select the text in the DOWN state and change its color in the Property Inspector.
The DOWN state shows what the button looks like when the mouse button is depressed over the button.
The HIT state indicates the area that is "hot", or the clickable area of the button.
Since you'll want the entire area around the text to be "hot" (responsive to a button click), select the Rectangle tool and draw a filled box to cover the text. The color of your rectangle doesn't matter because it is only indicating the clickable area of your button. The viewer will never see the HIT keyframe of your button. The filled rectangle will sit under your text because Flash will always display text over shapes unless they are separated on different layers.
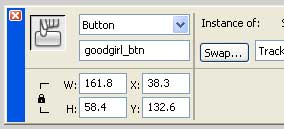
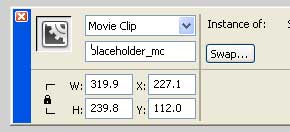
10. Return to the main movie timeline. Select your first button on the stage. In the Property Inspector, enter a name in the <Instance Name> field.
By naming a button, you can identify it with ActionScript and attach code to it. Select the other buttons on the stage and give them unique names.
Note that you must follow a few rules on naming:
-Names must not contain spaces or special characters. Underscores are okay.
-Names must not begin with a number.
-You can not use names that Flash uses as special commands in the ActionScript language itself (such as this, new, Sound, Math, etc.), so make your names unique.
-Add the suffix, _btn, to your name to identify it as a button.
-Be mindful of upper- and lower-cases.
Note also that the name of your button on the stage (called an instance) is different from the name of the button symbol in your Library (created in step 12). The name of the symbol in your Library is merely an organizational aid. The name you give your instance in the Property inspector is the one that ActionScript will use to identify it.
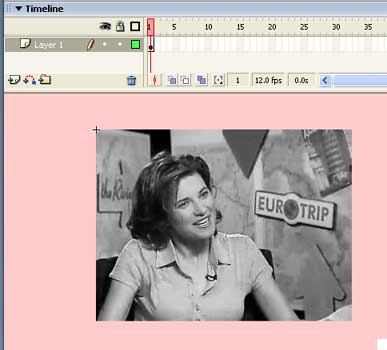
You will enter symbol editing mode for your new movie clip symbol.
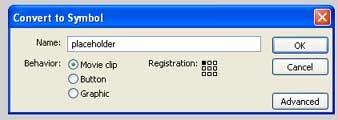
For this example, import a photo into your movie clip symbol, making sure that the top-left corner aligns with the tiny cross-hairs on the stage which represent the registration point. Also, be sure that your photo is the same size as your external SWF content. This photo is 320x240 pixels.
If you chose not to put anything in your movie clip symbol, then your instance on the stage will be represented by a simple white circle.


Assign ActionScript to your Buttons
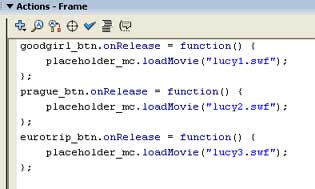
25. Select the first keyframe of the "Actionscript" layer and open the Actions panel. Enter the following code:
goodgirl_btn.onRelease=function(){
placeholder_mc.loadMovie("lucy1.swf");
}
where goodgirl_btn is the name of your first button, placeholder_mc is the name of the movie clip placeholder, and "lucy1.swf" is the name of the first external SWF file. Be sure to include the quotation marks around the name of the SWF file. The loadMovie command loads a specific SWF file into your Flash movie and puts it into a movie clip, completely replacing its content. The top-left corner of the external SWF will always line up with the movie clip's registration point.
Enter additional Actionscript code for each button that you have on the stage.
For the individual Quicktime movies, download lucy1.mov, lucy2.mov, and lucy3.mov.