Modular Navigation with the Movie Clip
In a simple navigation scheme, you enable the audience to jump around the main timeline to access different content. However, in a more complex environment, that way of navigating becomes unwieldly and makes editing a little more time consuming. It’s often better to think in navigation “modules”. Think of navigation modules as tiny, independent timelines that you can control. Instead of moving the playhead of the main timeline, you move the playhead of these modules. Because all the content are contained within these modules, they can be easily edited or moved around without much hassle. These modules are built with movie clips, another type of Flash symbol.
| In this example, the round buttons on the left change the content on the stage. However, the playhead is not moving around the main timeline to show us different colored squares. |
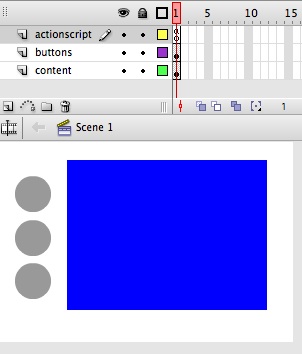 |
This is the main timeline, which consists of just a single frame. The buttons on the main timeline tell the playhead inside the movie clip to move to different frames, showing us different colored squares. |
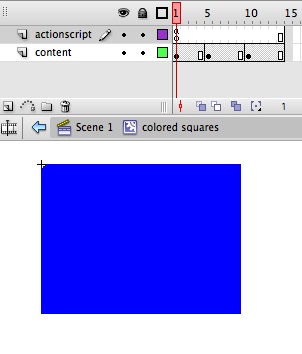 |
This is the timeline of the movie clip symbol, with a stop() action in the very first frame to prevent it from playing automatically. |
By keeping the content modular—that is, contained within a single movie clip—it is much easier to handle, and you can even add a second movie clip on the main timeline that is independent of the first.
In order to control the timeline of a movie clip, you must first name the movie clip instance on the stage in the Property Inspector. Once it has a name, you can reference it in Actionscript.
Creating Modular Navigation
1. Choose Insert>New Symbol (Ctrl-F8 Windows, Cmd-F8 Mac). Choose Movie Clip as the type and click OK.
2. You will be put inside Symbol-editing mode. On the timeline of your movie clip symbol, create several keyframes, each containing different content. In this example, each keyframe has a different colored square. You can import photos, write text, create animation, or even have video in each keyframe. Click on the play button in the Quicktime controler to watch the movie.
This movie clip symbol has keyframes at frames 1, 5, and 10.
3. Rename this layer “Content”. Insert a new layer, and name it “Actionscript”.
4. Select the first frame of the new layer. Open the Actions panel, and in the Script pane, add a stop() action. This prevents the movie clip from playing its timeline automatically.
5. Return to the main timeline and drag an instance of your movie clip symbol from the library on to the stage. While it’s still selected, give it a name in the Property Inspector. Remember to follow the rules of naming in the lesson on buttons. The extension for movie clips is “_mc”.
6. Now create your button symbol. When you’re done, drag three instances from the library on to the stage. Select each one and give each a name in the Property Inspector.
7. Insert a new layer and rename it “Actionscript”. Select the first frame and open the Actions panel. Enter the following code in the Script pane:
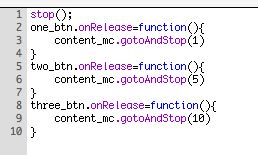
The code should look familiar if you’ve done the lesson on buttons. Look at lines 3, 6, and 9. Those lines are the crucial point in this lesson. We precede the gotoAndStop() command with the name of the movie clip and separate them with a dot. This tells Flash to target the movie clip called “content_mc” and move the playhead of that particular timeline. You can use different commands or target different movie clips on the stage as long as you use the same syntax—instance name, then a dot, and then the command.