Embedding Video and Flash 8
by Russell Chun
Adding video to Flash is an easy way to add rich content and integrate it with other animated and interactive Flash elements. There are several options to display video in Flash, Embed Video, Progressive Download, and Streaming Video.
| |
Embed Video |
|
Streaming Video |
| Video clip is under 2 minutes |
YES |
|
|
| Video clip is over 2 minutes |
|
YES |
YES |
| Flash Player version |
6, 7, 8 |
7, 8 |
6, 7, 8 |
| Usage |
Short, small (320x240) video clips that need to be synchronized to other Flash elements on the Timeline |
Longer, larger (720x480) video clips that do not need to be synchronized with other Flash elements on the Timeline. Flash 8 provides pre-made "skins" to control playback of video. |
Large quantities of video, very long video clips, and live and multiway streaming (such as webcam chat and live event broadcasts). Requires special server software (Flash Streaming Server). |
Embed Video
Embedding video in Flash is the simplest way to add video, and is the oldest. It is supported by Flash player versions 6, 7, and 8 (Flash MX, MX04, and 8). If your video clip is short, embedding your video lets you synchronize it to other Flash elements. However, Flash cannot maintain audio synchronization in embedded video that runs over 120 seconds. There is also a maximum length of 16,000 frames for embedded movies. Another drawback of embedding your video is the increase in filesize of your Flash project, making testing the movie (Control>Test Movie) a longer process, and the authoring sessions more tedious. An alternative solution is to embed video in a SWF and use the command loadMovie() to load the external SWF into your main Flash movie.
Progressive Download
Progressive download of video into Flash requires that you create a Flash video file (FLV) and keep it external to your Flash movie. ActionScript is required to tell Flash to playback the video. However, in Flash MX04 Professional and Flash 8, media components are provided for ready-made playback interfaces or "skins". Since the video resides external to your Flash movie, you cannot synchronize other Flash elements to your video. Follow this link for the tutorial on progressive download.
Streaming Video
Streaming video into Flash requires special server software, so this method will not be discussed.
For additional information about integrating video in Flash, please the Flash video learning guide on Macromedia Developer Center.
Tips for Working with Video Files and Flash
When importing video into Flash, use uncompressed video/audio files. Remember that Flash will apply its own compression to imported video clips (Sorenson for Flash players 6 and 7, and On2 VP6 for Flash Player 8), so avoid further degradation in quality by using uncompressed files.
If you do not have sound, remember that you cannot hear your video within the authoring environment--you must choose Control>Test Movie.
If you do not have sound, check your source Quicktime video clip. Sometimes the QT file is using an audio compression scheme that Flash doesn't recognize. Open your videoclip in Quicktime. Then Choose File>Export. Choose "Options" next to the Export pulldown menu and choose a different audio compression (AAC works well and is a high-quality codec).
Flash compresses videos both spatially and temporally. Spatial compression happens within a single frame, much like JPEG compression of an image. Temporal compression happens between frames, so the only information that is stored is the differences between frames. Therefore, the videos that compress the best are those that have minimal motion because there is less change from frame to frame. Therefore, when possible, avoid full-screen motion, camera effects such as panning and zooming, or transitions like wipes, fades, and dissolves. |
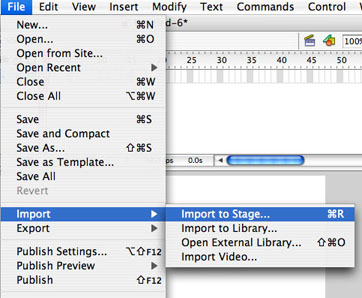
To Embed Video into Flash 8:
| 1 |
Choose File > Import > Import to Stage (Cmd-R/Ctrl-R) |
 |
| 2 |
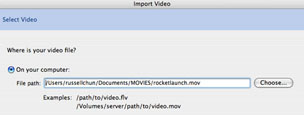
The Import Video Dialogue box appears, which will guide you through the video import process. |
|
| 3 |
In the first screen, verify the path and filename of the video clip you want to import. Click Continue. |
 |
| 4 |
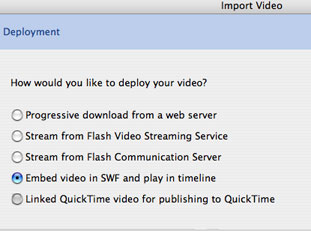
DEPLOYMENT
In the next screen, "Deployment", you will choose how you want your video to appear in Flash. The simplest method is to choose the fourth option, Embed video in SWF. This method works for older versions of the Flash player and allows you to synchronize other Flash elements with your video. However, you are limited to short video clips (about a maximum of 2 minutes). |
 |
| 5 |
EMBEDDING
In the next screen, "Embedding", you will choose how your video will be embedded in Flash. Choose Symbol Type: Embedded Video and Audio Track: Integrated. Leave the other options checked as shown here. You can always convert your embedded video into a symbol later if you need to apply a motion tween to it. |
 |
| 6 |
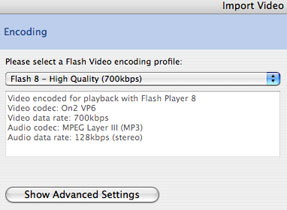
ENCODING
In the next screen, "Encoding", you will choose the compression settings to determine the quality of your video and audio. If you want to publish your Flash movie for a previous Flash player version, choose Flash Player 7-High Quality. If you want to publish your Flash movie for the latest Flash player version, choose Flash Player 8 - High Quality. Higher quality results in a better picture, but a larger filesize. Lower quality results in a more degraded picture but a smaller filesize.
|
 |
| 7 |
Now click "Show Advanced Settings" |
|
| 8 |
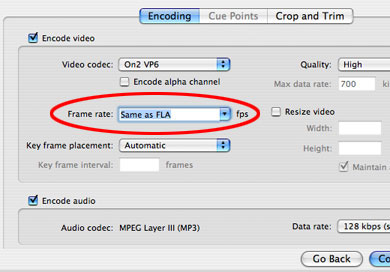
ADVANCED SETTINGS: FRAME RATE
In the expanded set of options, choose Frame rate: Same as FLA. This synchronizes the frame rate of your video to the frame rate of your Flash movie and ensures that your video plays at its intended speed.
(If your Flash frame rate is 12fps and your video frame frate is 24fps, and you do not choose this option, your embedded video would play twice as slow within Flash.) |
 |
| 9 |
Click "Continue" to finish the guided process. Flash encodes the video, which may take a few minutes, depending on your video size. |
|
| 10 |
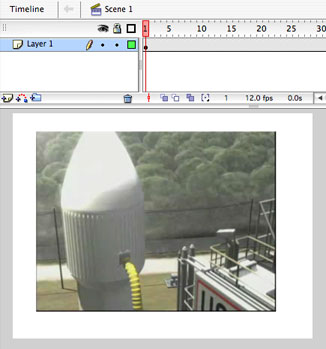
Flash imports the encoded video into your Library and places an instance of the video on the Stage. Flash adds enough frames on the Timeline so the entire video can play. |
 |
| 11 |
You will not hear any sound from the video in the authoring environment. Choose Control > Test Movie in order to export a SWF to see and hear your newly embedded video. |
|